Move Shoot Move TRIDAPTER 3-Axis Smartphone Adapter – Overview & Digibinning Setup
 June 25, 2024 | Posted by Best Binocular Reviews
In my ongoing quest to continue improving the optics reviews here on BBR, I’m currently on the hunt for a very special adapter that I can use to take video and photos through the optics that I am testing as a potential way of comparing and sharing the views with you, rather than just describing it as I have done in the past.
The holy grail: a high-performance, user-friendly adapter that seamlessly connects my camera and/or phone to a vast array of optics which must include a wide variety and size of binoculars, monoculars, spotting scopes and even night vision devices – you name it, I need this adapter to handle it!
The ultimate goal? High-quality and repeatable digiscoping and digibinning, allowing me to capture and share images and video clips that directly and fairly represent the view that I actually see through any optic I review. This way, my reviews can not only rely on my descriptions but accurately showcase the true potential of each optic which I feel will be extremely helpful.
Enter the TRIDAPTER from Move Shoot Move
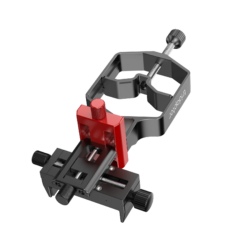
Described by the makers as a “High Precision Digiscoping Adapter for Spotting Scope, Telescope, Binoculars, Microscopes and Monoculars” is the headline which first grabbed my attention, so I reached out to Move Shoot Move explaining what I was after and they kindly agreed to send me the Tridaptor to test:
Here’s a breakdown of its key advertised features:
- Universal Smartphone Compatibility: Will accept most smartphones (60mm – 87mm wide ( 2.36 in – 3.42 in)
- Wide Compatibility: Clamps securely onto eyepieces that are from 22m, right up to about 61mm ( 0.86in ~ 2.4in) in diameter.
- High Quality. All-metal construction: No plastic parts! The Tridaptor is 100% Aluminum and CNC machined.
- Precision 3-Axis Micro Adjustments: Enables exact centring of the smartphone camera on the eyepiece via X, Y, and Z-axis adjustments.
Considerations:
- The adapter is for smartphones only and does not accept DSLR or Bridge cameras – I have yet to find an adapter that can do both.
What’s Included:
Inside the box, I found the following:
- TRIDAPTER Smartphone Digiscoping Adapter
- Bluetooth Shutter Release
- User Manual, a pamphlet with some tips for setup and a 10% voucher on a future purchase at Move Shoot Move.
Setting Up the TRIDAPTER for Digibinning
In its most basic form, all you need to do when taking photos through binoculars (digibinning) is to hold up and align your camera to one of the eyepieces. Focus on your subject and click away.
It sounds simple and at times doing it like this can work out well. But this “freestyle” method does not always work well and is especially difficult if you have a moving subject and a pair of binoculars that are perhaps not ideally suited for digibinning (small exit pupil for example).
So a good adapter that can make fine adjustments and hold the camera very sturdily at a precise point behind they eypiece makes it very much easier to get a good image.
Image Stability
As with standard photography, especially when using a high-power telephoto lens, a steady camera is essential for achieving the best results. So here, better cameras and /or lenses with have some sort of image stabilization built into them and then on top of this photographers will often also use a tripod.
Depending on the binoculars, you can get away without using a tripod. So you can either use low or moderate magnification binoculars (I would say 8x would be maximum), or, as I have also done, use image stabilized binoculars:
Image Stabilization Demo – Kite APC 14x50 Binoculars
In the first example video below, I simply held up the Kite binoculars to my bridge camera that was mounted on a tripod. So I did not use an adapter and whilst the camera was 100% steady, the binoculars were not
Image Stabilization Demo 2 – Opticron Imagic IS 16x42 Binoculars
In this second example, the binoculars I used were the 16x42 Opticron Imagic Image Stabilized Binoculars. Once again, I did not use an adapter and this time instead of my a bridge camera, I used the camera on my phone to capture the footage.
So as you can see, to get a shake-free image you really do need some sort of image stabilization. For most users, this will mean fixing your binoculars onto a tripod, which is the setup I will go through below:
TRIDAPTOR Digibinning: What You Need
- Move Shoot Move TRIDAPTOR 3-Axis Smartphone Adapter
- Smartphone with a camera
- Binoculars
- Binocular Tripod Adapter
- Tripod

1. Binocular and Tripod Connection:
- Ensure you have a tripod adapter for your particular binoculars. This typically screws into a threaded socket located on the front of the centre hinge. Note: not all binoculars have this, if not there are other options – take a look at my guide to Binocular Tripod Adapters
- Secure the tripod adapter to your binoculars. Tighten it firmly for stability.
- Attach the tripod adapter to the mounting plate for your tripod head. Tighten it firmly for stability.
- Fix the mounting plate with the binoculars attached to your tripod head. Tighten it firmly for stability.

2. Attaching the TRIDAPTOR:
- On your binoculars, Ttist/fold down the eyecup on the eyepiece you want to mount the adapter onto
- Open the clamp on the TRIDAPTOR, designed for the eyepiece.
- Slide it over the eyepiece, if sure, try to make sure you go over at least some of the eyecup so that it will fix onto the main barrel of the binocular and not just the eyecup as this will make the connection much more sturdy and you will have less chance of breaking the eyecup – especially important if your binocular has plastic eyecups
- Tighten the knob to secure the TRIDAPTOR. Ensure a tight fit, but be sure not to overtighten as this could damage the eyecup or eyepiece of the binocular

3. Adding Your Phone:
- Screw open/close the clamp on the TRIDAPTOR using the screw on the left side until it will accept the width of your phone.
- Slide your phone into the clamp, ensuring the camera lens aligns roughly with the eyepiece – at this stage, you only need to be approximate.
- Tighten the phone clamp securely. Once again it should be tight enough so the phone is held secure, but not so tight as to damage it.

4. Camera Mode and Fine Adjustments:
- Turn on your phone and launch the camera app.
- You might see a black circle through the camera viewfinder. This indicates misalignment between the phone camera and the eyepiece.
- The TRIDAPTOR features three knobs for micro-adjustments:
- X-axis knob: Moves the phone camera left and right.
- Y-axis knob: Moves the phone camera up and down.
- Z-axis knob: Adjusts the distance between the phone camera and the eyepiece (maybe less frequently used).
- Use these knobs carefully to center the image from the eyepiece within your phone’s camera viewfinder. Aim for a complete picture without any black edges.
5. Using a Remote Shutter Release (Optional):
- Consider using a remote shutter release (not always included with the TRIDAPTOR) to minimize camera shake when capturing images. This is especially helpful for high-magnification digiscoping.
Tips:
- Practice aligning your phone camera with the eyepiece at home before venturing outdoors.
- Use a sturdy tripod for optimal stability.
- Binoculars with large exit pupils will generally be easier to use (initial alignment) and will often produce a brighter image.
Initial Results
Below are some samples from what I have managed to capture from my first couple of tests using the Tridapter from Move Shoot Move. Over Time I will be adding more:
In the video below, I used the camera on my phone with the Move Shoot Move Digiscoping Adapter, which was connected to the KITE APC 18x50 Image Stabilization Binoculars, which were then fixed onto my Vanguard Abeo Pro 283CT Tripod which in turn has my MOVO GH1000 Gimbal Tripod Head on top of it.
Note: It was a windy day and the bird feeder was blown about a lot. So whilst my setup was steady, the movement of the feeder makes it hard to see any detail (see the first video below). The good news is this can be corrected with software, I use DaVinci Resolve – see the second video which is the same footage, has this movement corrected.
The footage below was captured using the camera on my phone with the Move Shoot Move Digiscoping Adapter, Bresser Pirsch 9-27x56 Gen II Spotting Scope and the Bresser BX-5 PRO Video Tripod
Cost & Where to Buy
The Move Shoot Move Tridapter Smartphone Adapter Digiscoping Adapter retails for around 60 EUR / £62 / $70
In-Depth Evaluation
Conclusions
Having now used this smartphone adapter with a couple of different binoculars and scopes, I am super impressed and very happy with it because apart from a few very minor points, it gets very close to checking all the boxes in my quest for the ultimate digibinning & Digiscoping Adapter.
The only slight reservations I have are:
- I need to use a phone camera. I think I may get better-quality images and video with my bridge camera
- Because of the design and the way it attaches to a binoculars eyepiece, you either have to shoot in portrait mode or turn the binocular on its side to shoot in landscape. That is unless someone can tell me how to change the orientation of the camera on my phone without having to physically rotate the camera?

 Categories: Digiscoping |
  Tags: Digibinning, Digiscoping, Digital Camera Adapter, Tripod Adapter, Universal Camera Adapter |
  Comments Off on Move Shoot Move TRIDAPTER 3-Axis Smartphone Adapter – Overview & Digibinning Setup